
Authentication
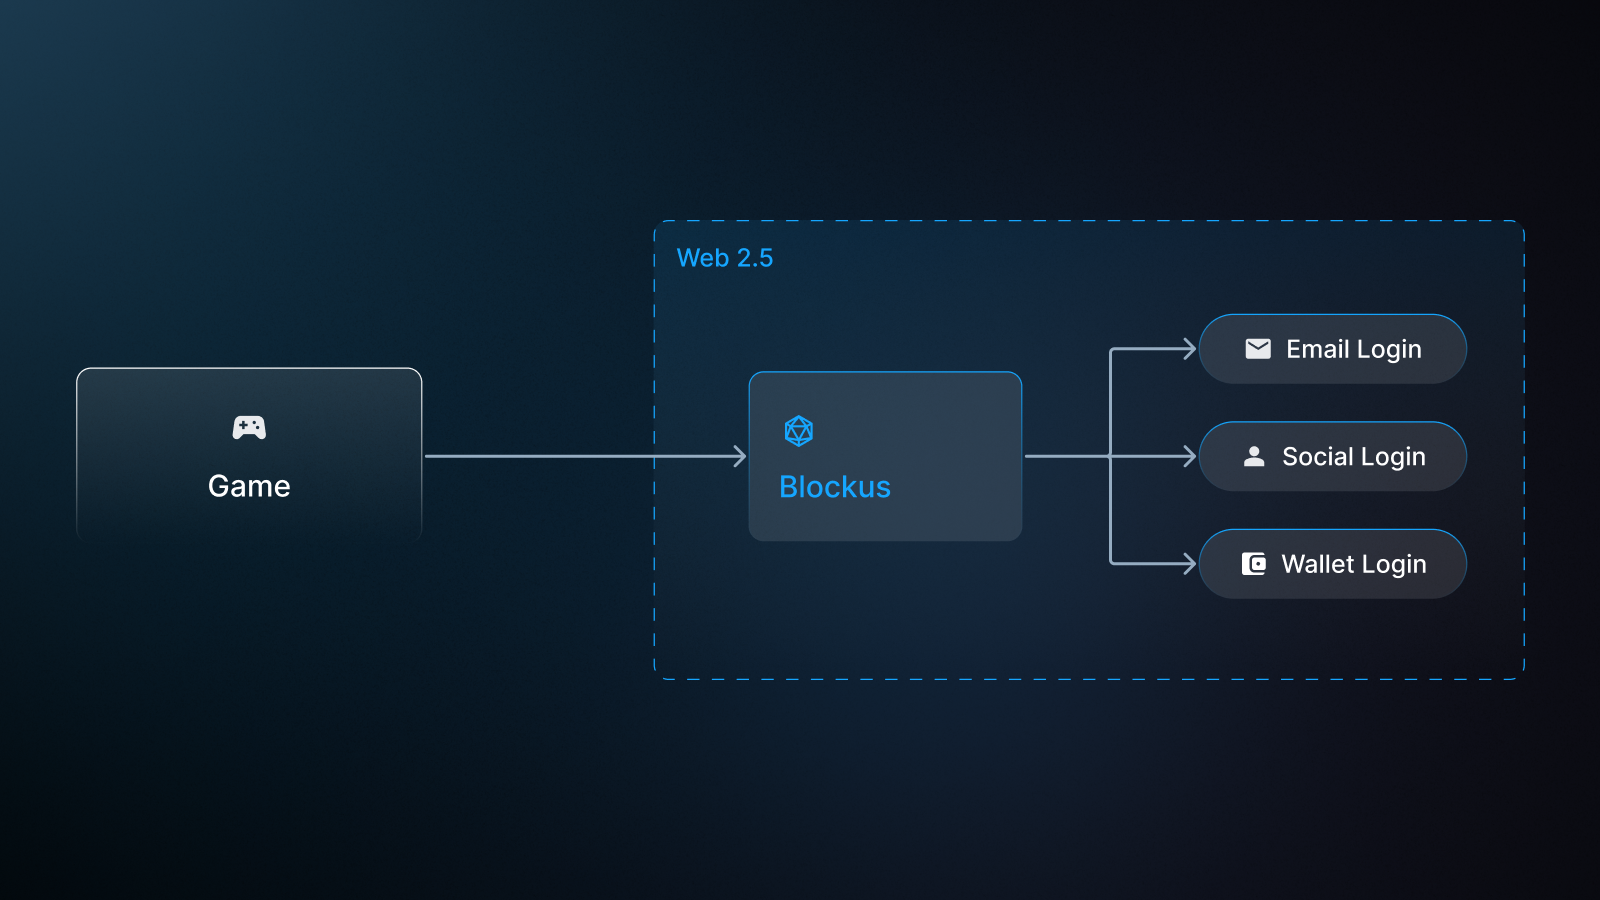
Blockus offers a flexible suite of login and authentication methods. It can either be the primary login method or piggyback off of existing login methods, such as an existing email login or Playfab login. This flexibility caters to a broad range of users and simplifies the onboarding process.
Single Platform Authentication
Blockus provides email and social login for your users.
Integrate Blockus Auth in your web app
In this tutorial, we will show you how to integrate Blockus Auth into an existing web project. After the integration, your users are authenticated through the Blockus Auth solution and will get a newly created wallet tied to their game. For optimal security, a new wallet is created for each game you register for.
Step 1: Go over your project list on the Developer’s portal, select the desired project, and select your Blockus Authentication settings.
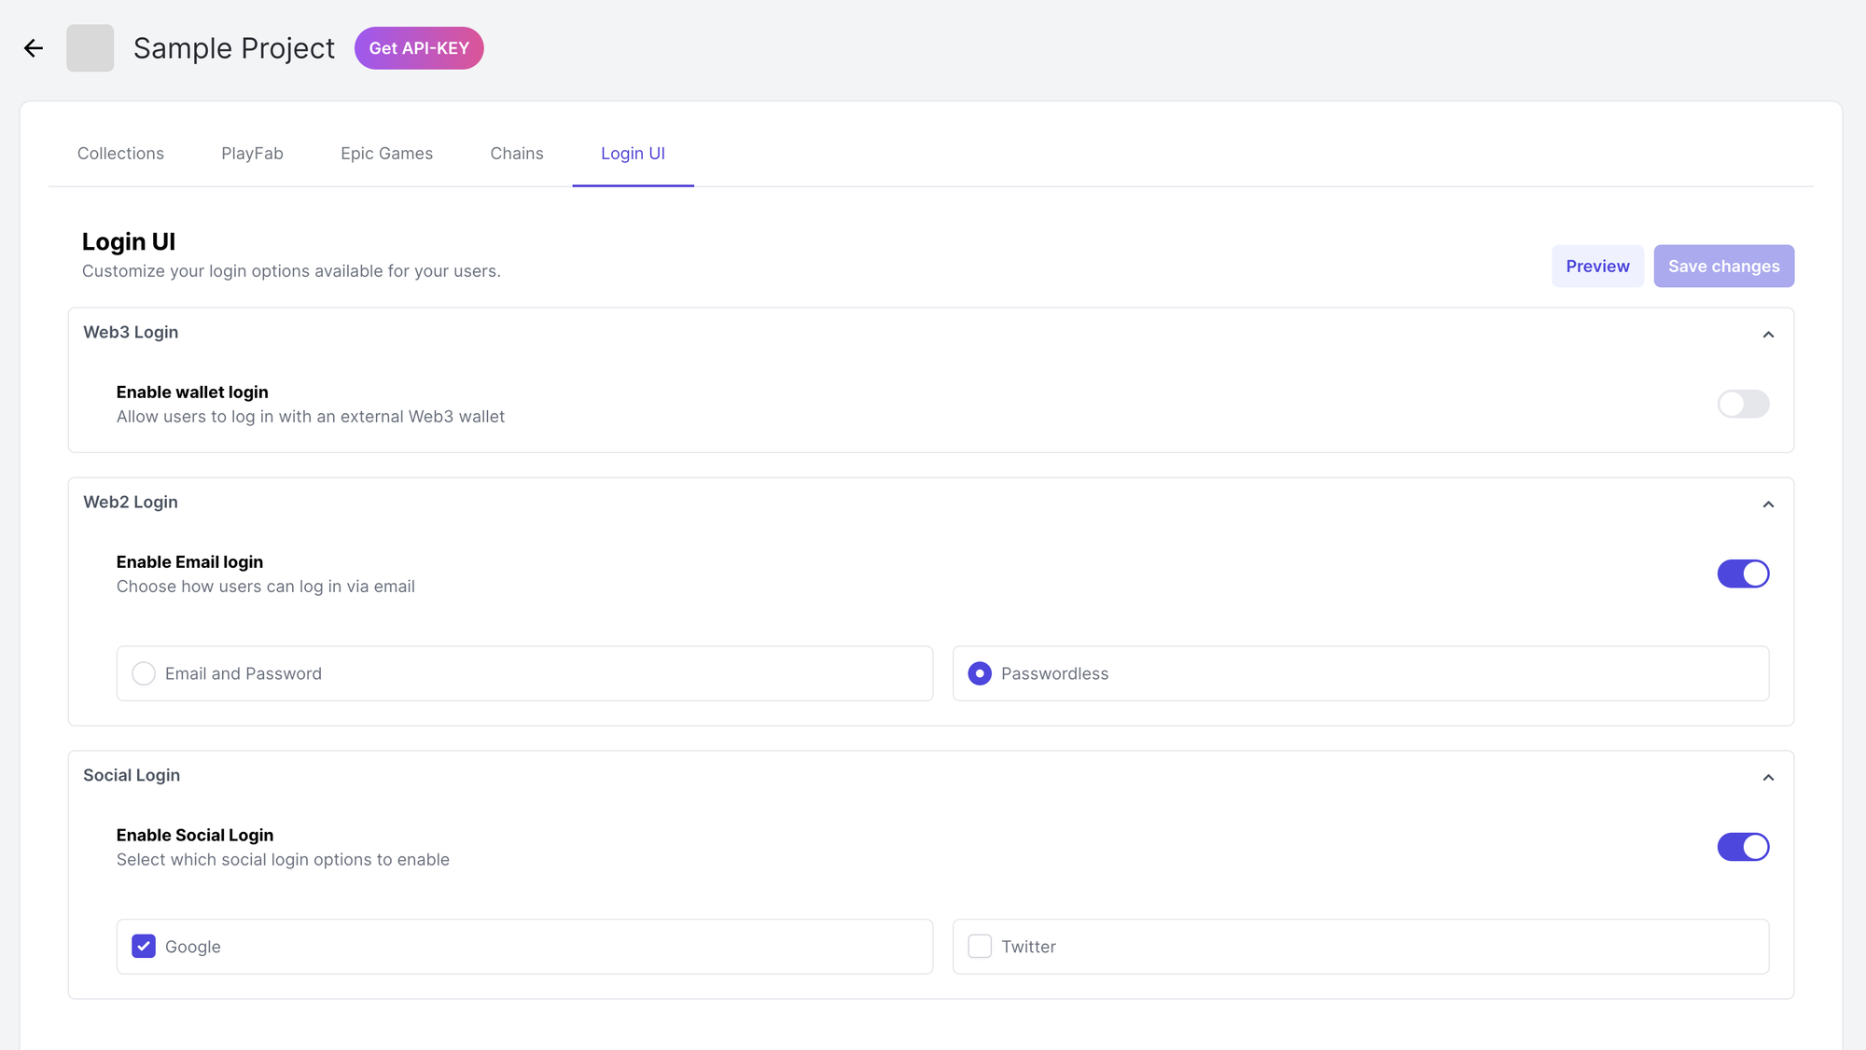
Step 2: Select options you want to use and save the changes by clicking Save changes button. You also play with the setting and look at https://auth-demo.blockus.gg/wizard
Step 3: Click on Preview button to see what your settings will look like. Noted that changes need to be saved before preview.
Now, let’s go to the code!
Step 4: Integrate it into your web app, the mechanism we are going to use is a redirection-based login like Google does. The result of a successful login will be a BAT (Blockus Access Token) that your website can use to access all the API and resources from Blockus.
const handleLoginWithBlockus = () => {
    const url = 'https://auth.blockus.gg/login?project=0gaBNtOx6m8Qxnm9ZntqY8XiuxNh&redirect=http://localhost:3000';
		window.location.href = url;
  }

<button onclick="handleLoginWithBlockus()">
  Login
</button>
The Blockus auth URL is in the following format:
https://auth.blockus.gg/login?project={blockus-project}&redirect={redirect-url}blockus-project is the ID of the project you had setup for the Auth config
redirect-url is the URL of the page after users are authenticated, you can get the access token from this URL
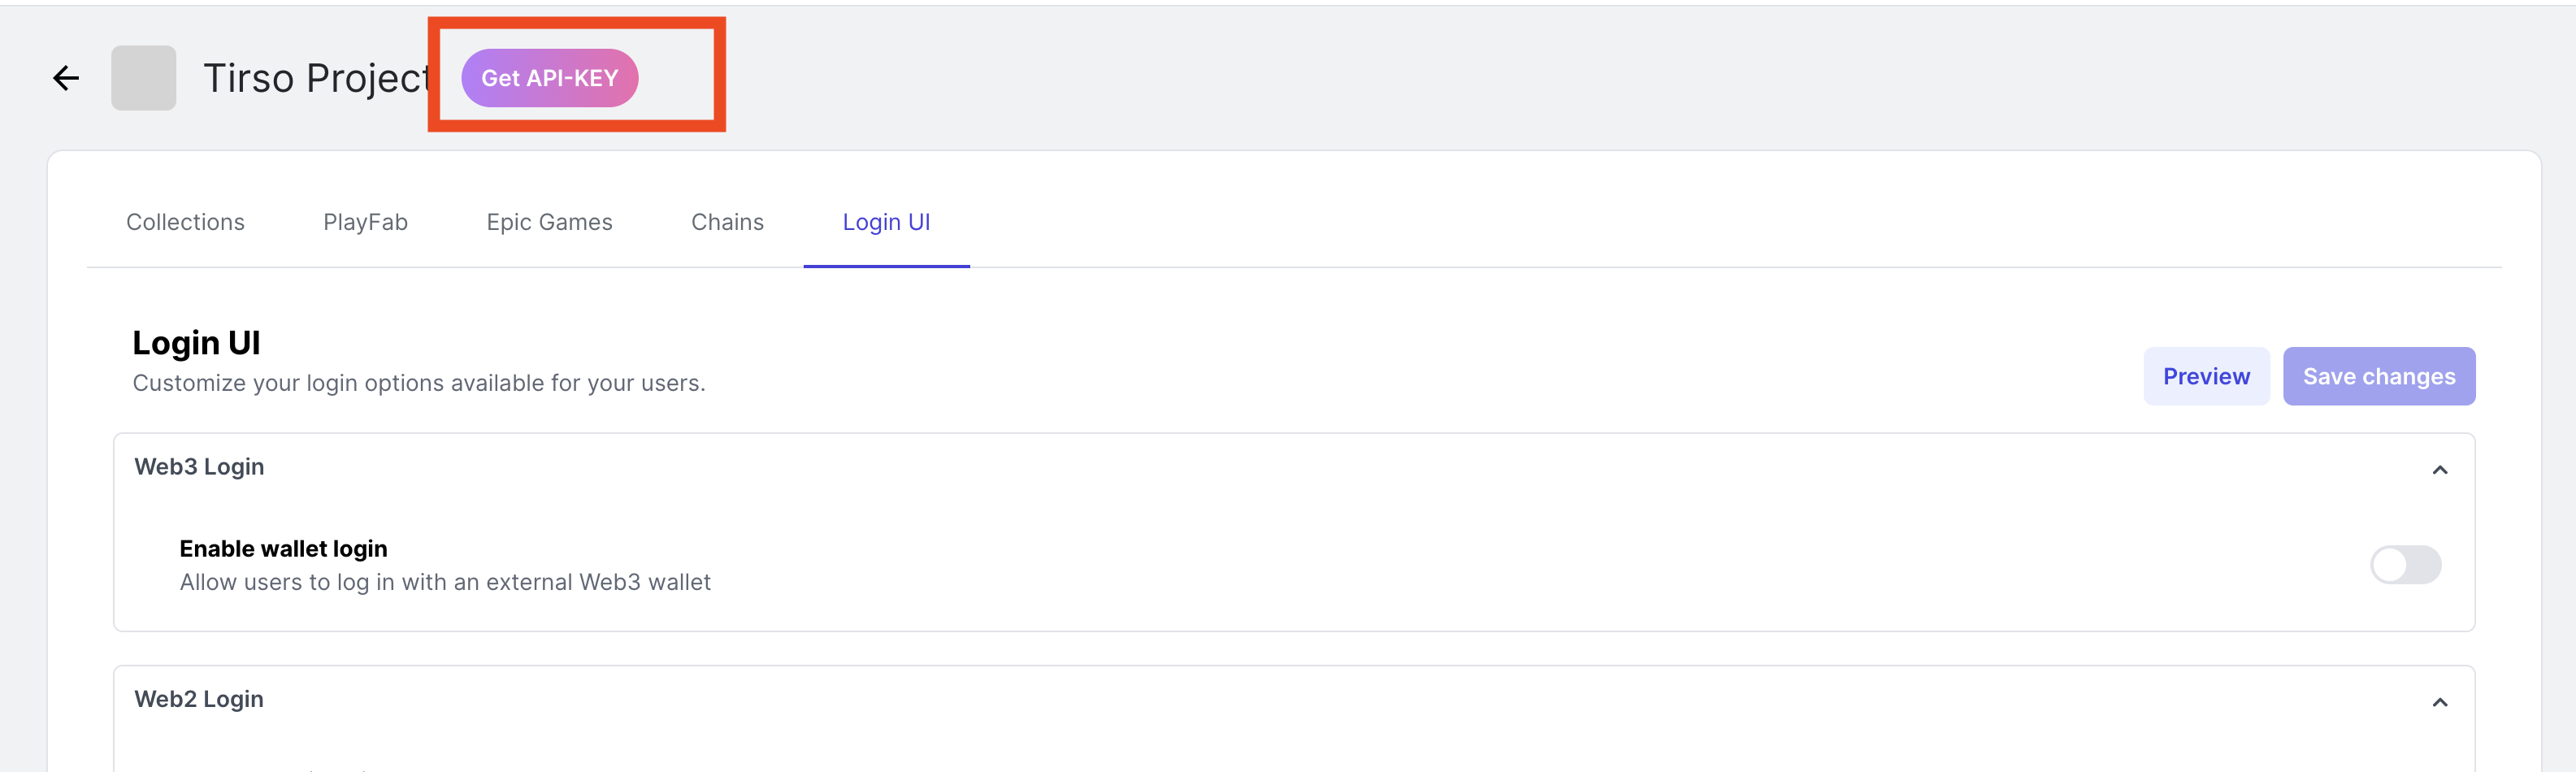
How to get your Blockus project id? Click the Get API-KEY button on your project
Step 5: Use the Blockus Access Token to access users’ wallets or other resources. The auth website will redirect back to your website and add the blockusAccessToken query parameter on the URL. Get the URL query parameter blockusAccessToken from your website after users are successfully authenticated.
// Get URL queryParams in Next.js / React router
const searchParams = useSearchParams()
const blockusAccessToken = searchParams.get('blockusAccessToken');
Tada~ You just integrated Blockus Auth into your web app. Let's take a look at a demo.
.## Cross Platform Authentication
Blockus provides both an Auth API and SDK for you to securely manage your user's authentication flow cross platforms, either with your game backend or any external account management services you use.
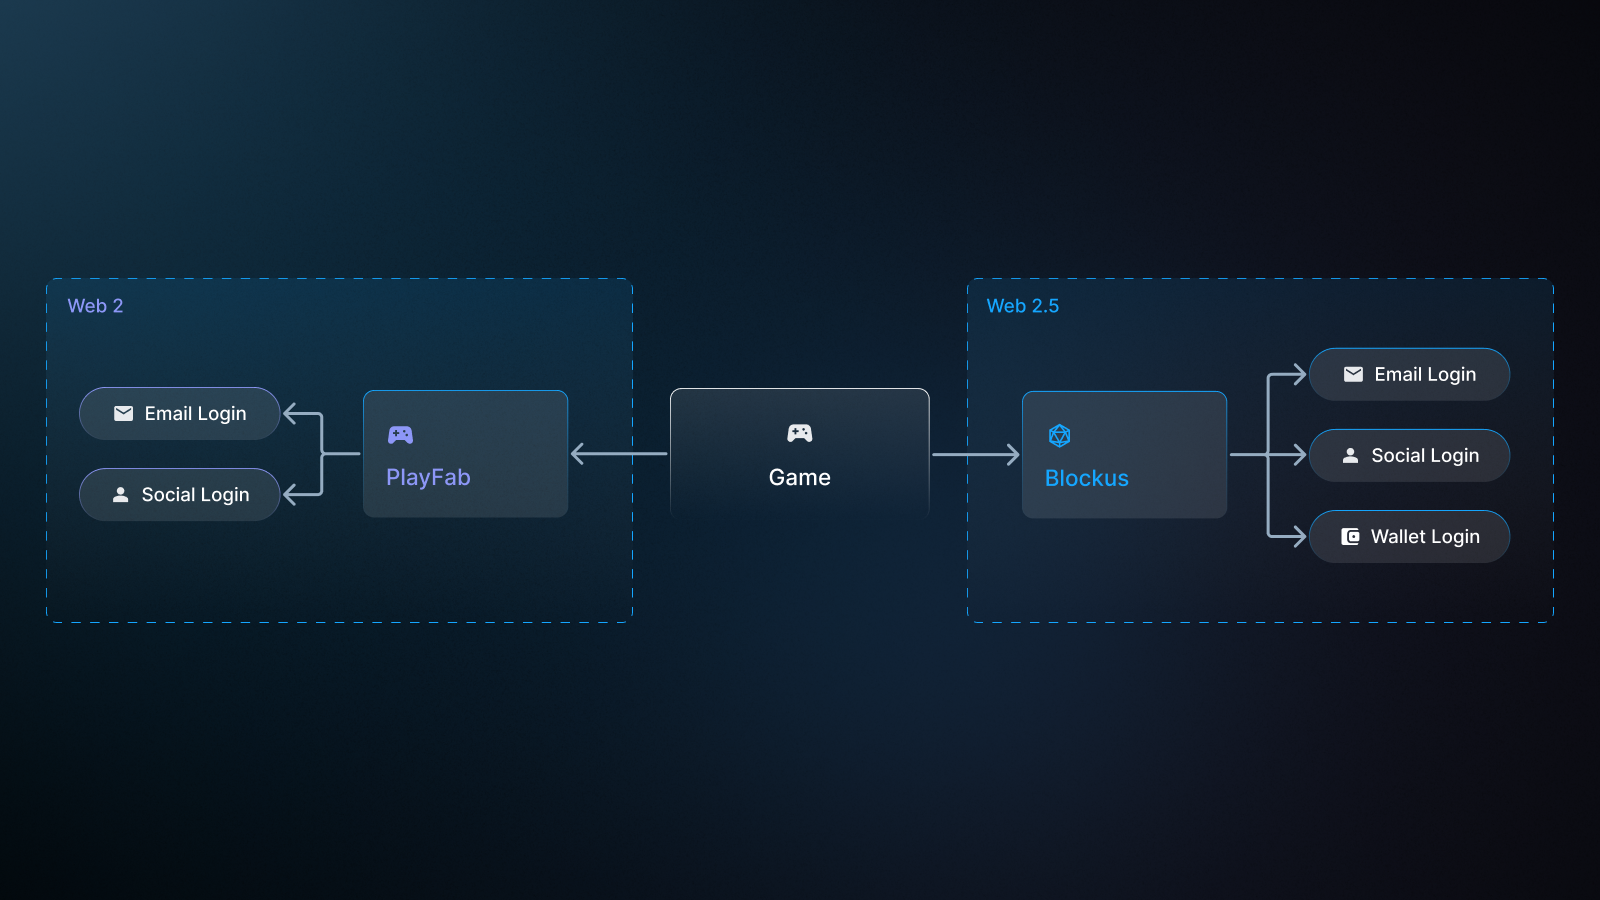
Web2 Login
For Web2 users, Blockus supports email login and social login. This currently includes Google Account Login, Apple Account Login, and Google Play Login. More social login methods are in development, please reach out any specific requests. The auth flow works as follows:
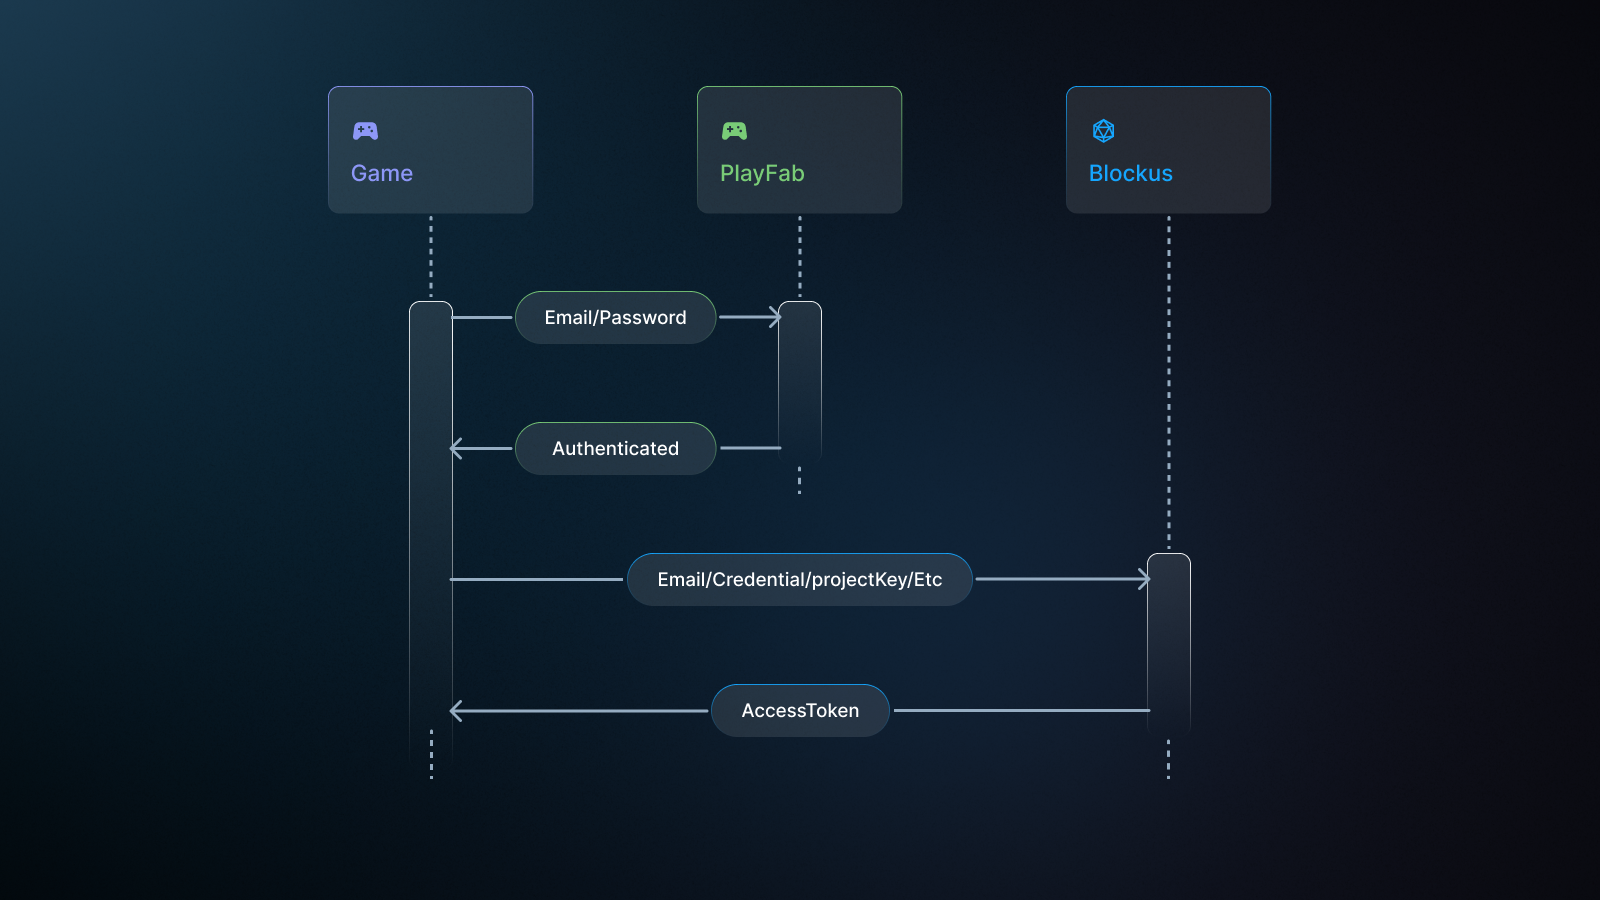
When users sign in with an email and password, Blockus server will return an access token which can be used to interact with Blockus services on behalf of the user. The access token expires after certain amount of time and the user needs to sign in again after expiration.
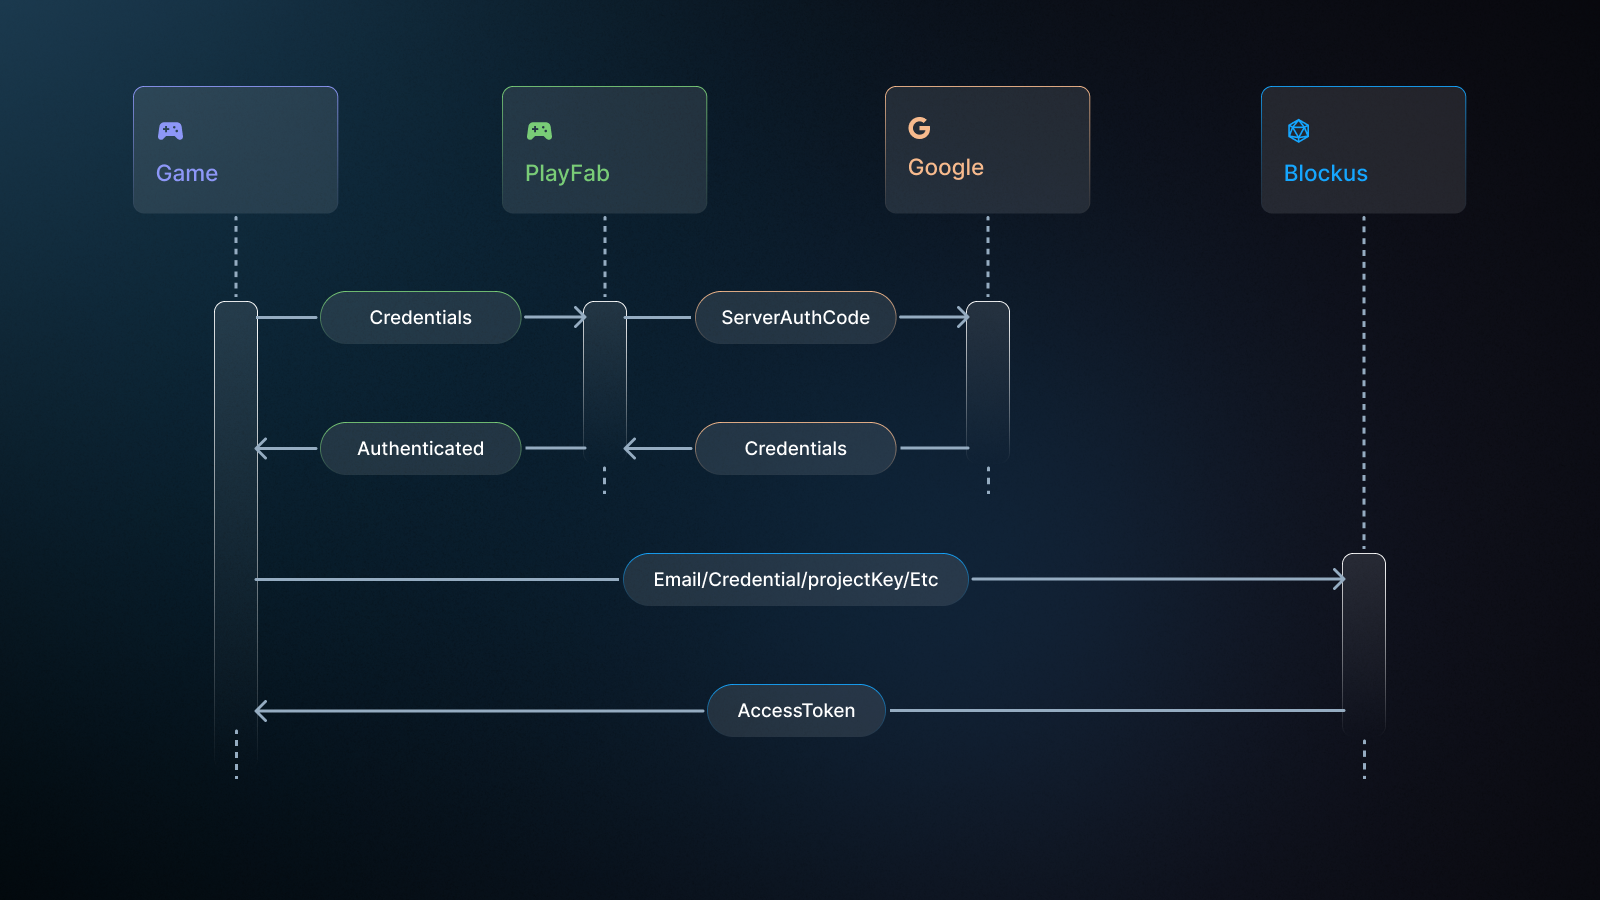
When logging in through a third party platform, the user's email address should be passed to Blockus in order to enable the access of items purchased on the Blockus provided first party NFT marketplace. For example, using the Playfab login, once the user email is passed to Blockus, Blockus will handle user mapping with our secure authentication system between PlayFab and Blockus.
PlayFab integration guide
To integrate with PlayFab in a seamless and secure way, we provide an authentication mechanism to integrate PlayFab directly, which allows your users only input their credentials once to register and log in to both PlayFab and Blockus.
Step 1 Log in to the PlayFab title. You should see the following dashboard:

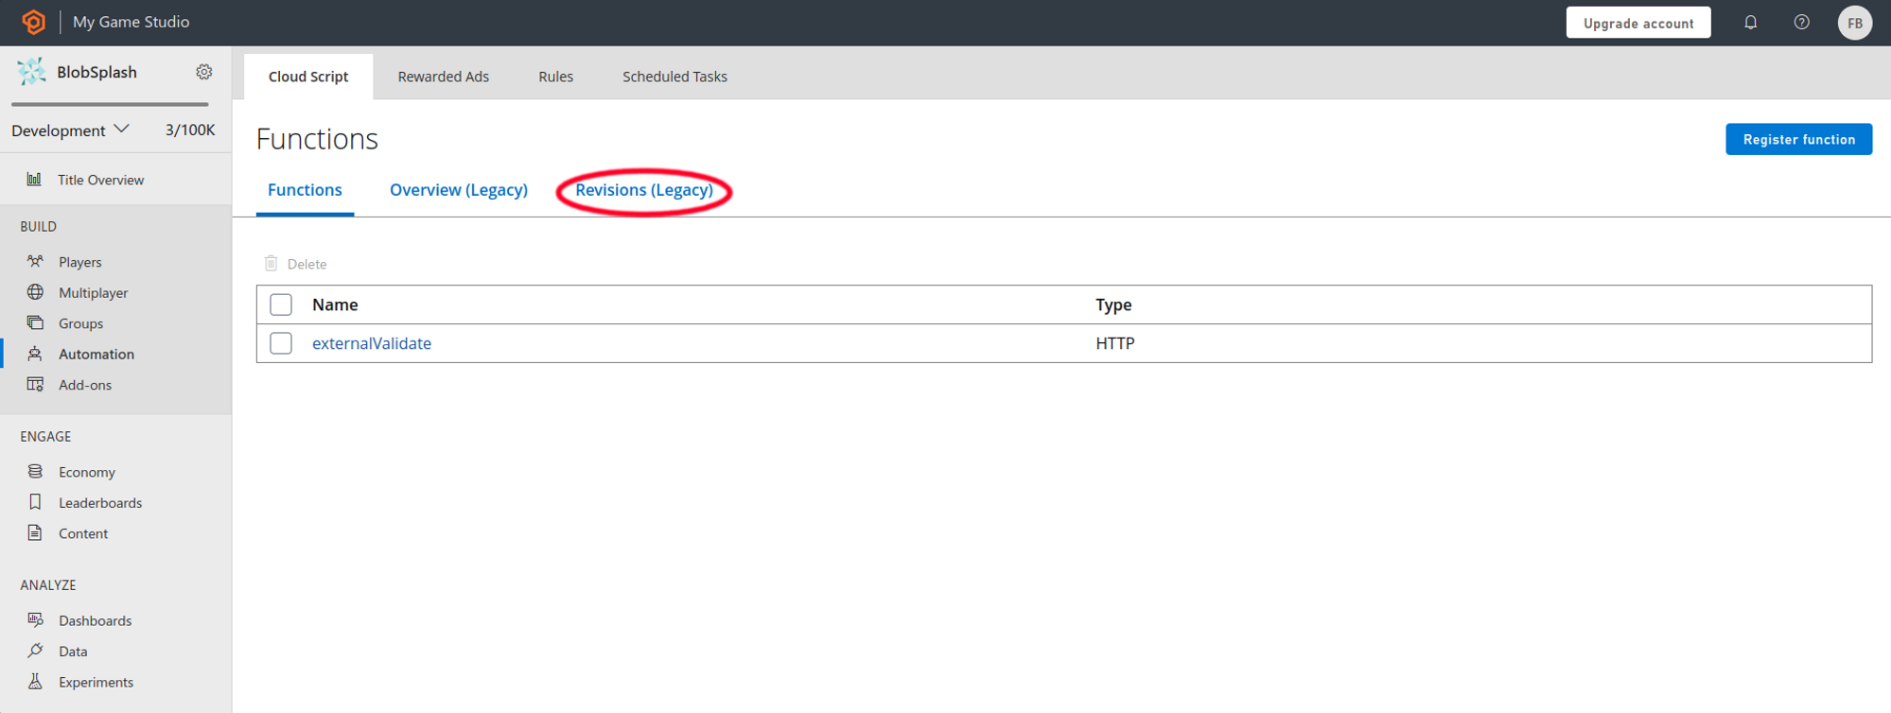
Step 2 Look for the Automation button listed on the left. After that, click on the Revisions (legacy) tab.
Here is where all additional PlayFab backend functionality resides. It's all javascript. Add the following snippet to the file:
handlers.verifySessionToken = function (args, context) {
  if (args.secretAccessKey !== "your_secret_key")
    return
  return server.AuthenticateSessionTicket({
    SessionTicket: args.ticket
  });
};
Your secret key can be found on Blockus dev portal, and this is the key used to access your PlayFab Authenticated Session. Using this method, you're able to link Playfab and Blockus without having to provide Blockus access to your PlayFab APIs.
Step 3 Once the script is added, click the button on the top right corner Upload new revision, it will save the new version. Share the titleId and secret with us. Soon you can upload the secret key to developer portal.

Step 4 Add your game title to Blockus dev portal so that Blockus API knows which PlayFab game to interact with.
Step 5 Now you can use the PlayFab login API /v1/playersWithPlayFab/login for a more secure login.
Epic Online Services integration guide
We've also integrated with Epic Account Management so you can seamlessly associate Blockus data with your existing Epic user information.
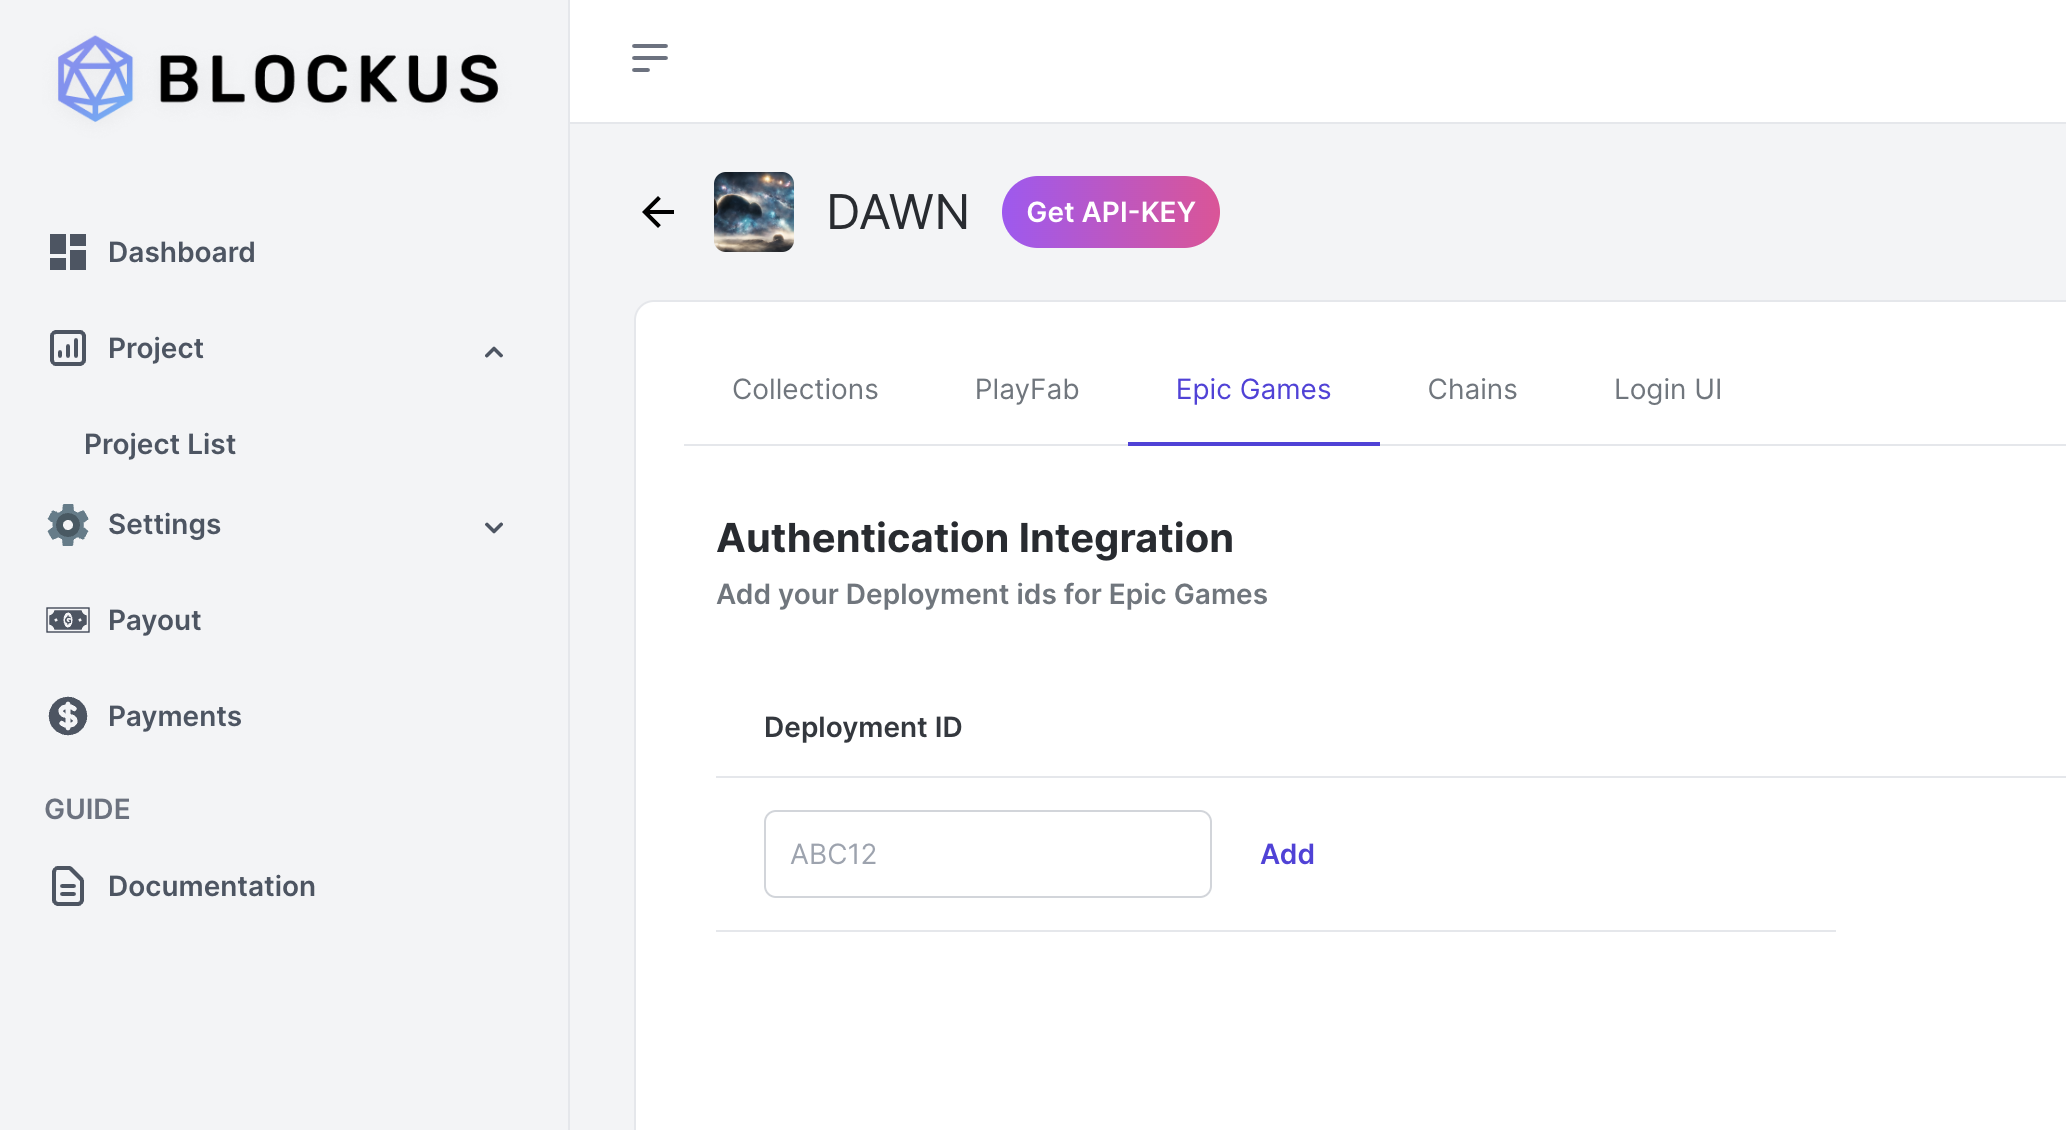
Step 1 Once your game is deployed on Epic, find the deploymentID
Step 2 Go to the "Epic Games" tab under your project (Blockus dev console -> Projects -> select your project) and add your deployment ID from Step 2
Step3 You're now able to use the loginWithEpic endpoint! Make sure to include the users PUID with each call.
Updated 10 months ago